How I Built a Fully Automated Document Management System with Paperless-NGX
How I built a zero-effort document management system for a family of four - 900+ documents across multiple languages with AI classification, barcode tracking, encrypted backups, and a scanner-to-archive pipeline that runs on autopilot.


Managing paper and digital documents for a family of four across multiple countries and languages was becoming unmanageable. Tax documents in German, medical records in English, contracts scattered across three email accounts, and a growing pile of physical papers that I could never find when I needed them.
I spent weeks building a fully automated document management system that now handles 900+ documents with zero daily effort. This post walks you through the entire setup — from the scanner on my desk to the encrypted backups on GitHub — with every configuration file and script you need to build it yourself.
The Problem
Our household generates a surprising amount of paperwork. Insurance letters, tax assessments, medical bills, employment contracts, kindergarten registrations, vehicle documents — all in different languages, arriving through different channels, belonging to different family members.
Before this setup, my "system" was:
- A physical folder that was always full and never organized
- Email attachments scattered across three accounts
- A phone full of photos of documents "I'll file later"
- No way to search for anything — I had to remember where I put it
I needed a system that could:
- Ingest documents from email, scanner, and manual upload automatically
- Classify documents by type, person, and topic using AI
- Track which physical documents I have and where they are
- Be searchable and accessible from anywhere
- Back itself up to multiple locations without my intervention
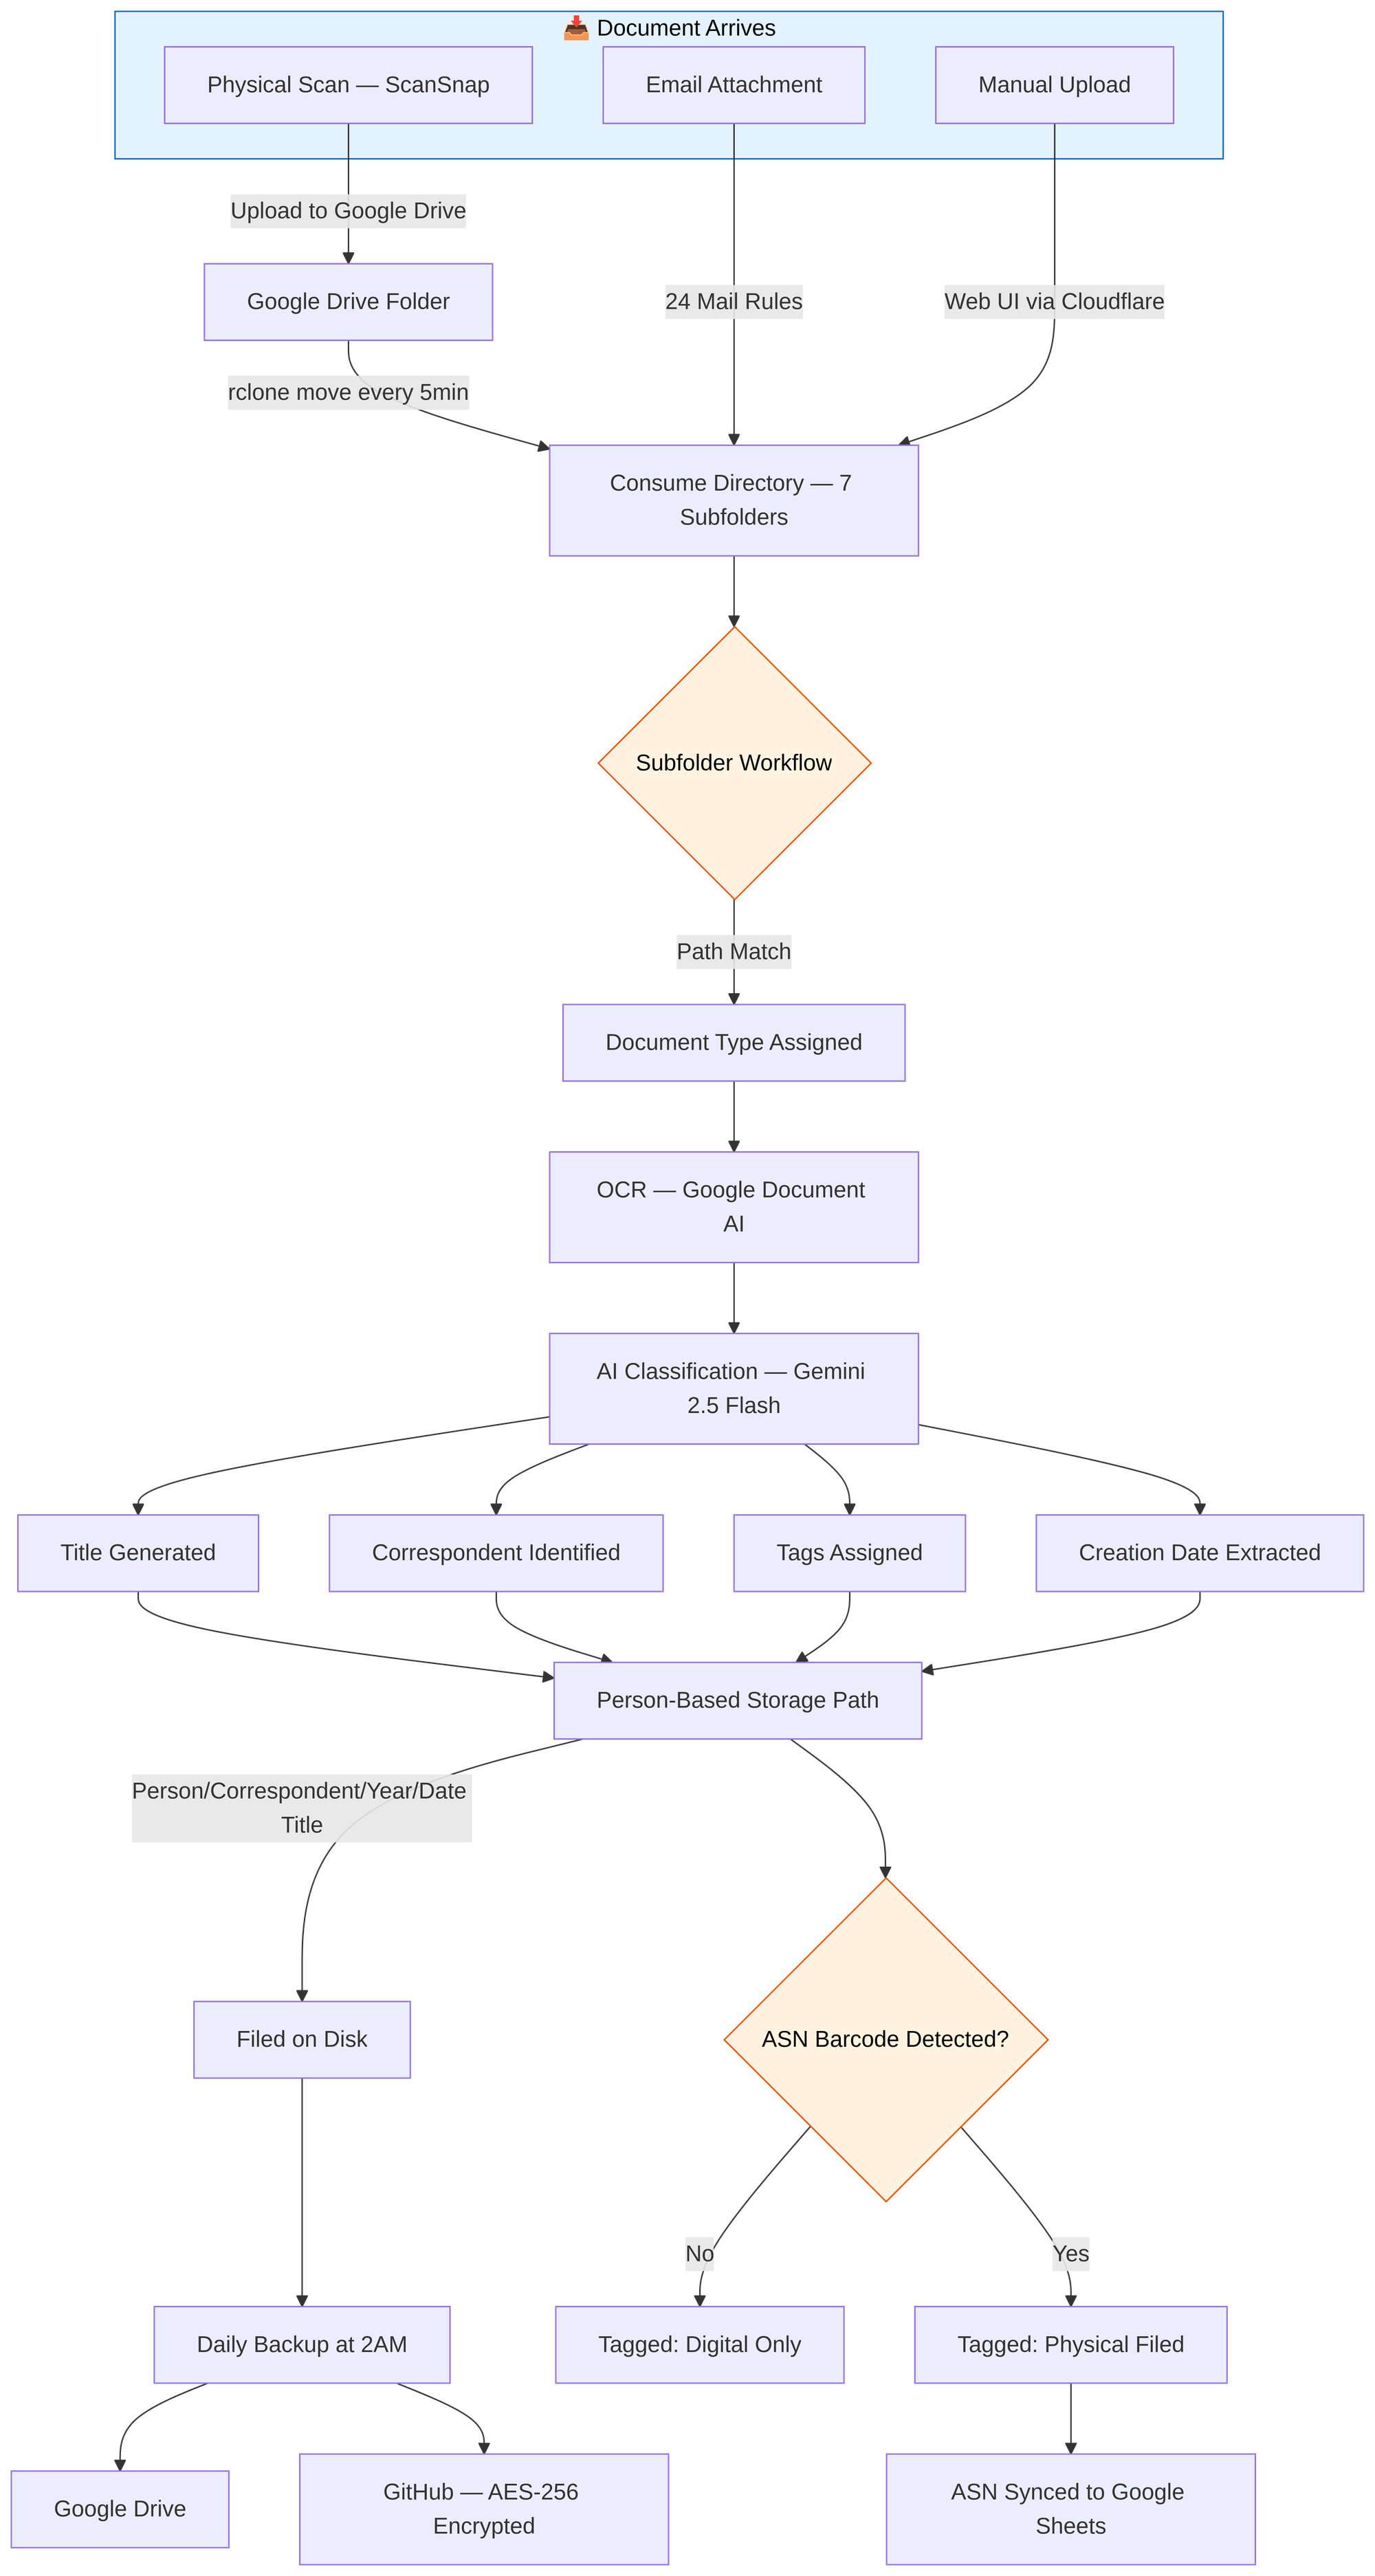
My Workflow: From Paper to Searchable Archive
Here's the daily workflow that now runs on autopilot:
Physical Documents
- A letter arrives in the mail
- I print an ASN barcode label using Avery Zweckform L4731REV-25 labels and their online designer, then stick it on the document
- I place the document on my Ricoh ScanSnap iX1600 scanner
- The scanner auto-uploads the PDF to a Google Drive folder, sorted into a subfolder by category (Finance, Health, Work, etc.)
- Every 5 minutes, rclone moves new files from Google Drive to the server
- Paperless-NGX detects the new file and starts processing
- A workflow assigns the document type based on which subfolder it came from
- Google Document AI performs high-quality OCR, then Gemini 2.5 Flash generates a clean title, identifies the correspondent, assigns tags, and extracts the creation date
- The document is filed on disk by person, correspondent, and year
- The ASN barcode is detected automatically — a cron job tags it as "Physical Filed" and syncs the ASN mapping to a Google Sheet
- The physical document goes into a numbered binder, matching the ASN
Digital Documents
- An invoice arrives by email
- One of 24 mail rules detects it and consumes the attachment
- The document is auto-tagged as "Digital Only" and goes through the same AI classification pipeline
The entire process takes about 30 seconds of my time (sticking the label and placing the paper on the scanner). Everything else is automated.
Architecture Overview
The system runs on a single VPS (4 vCPU, 8GB RAM, 80GB NVMe) with 9 Docker containers:
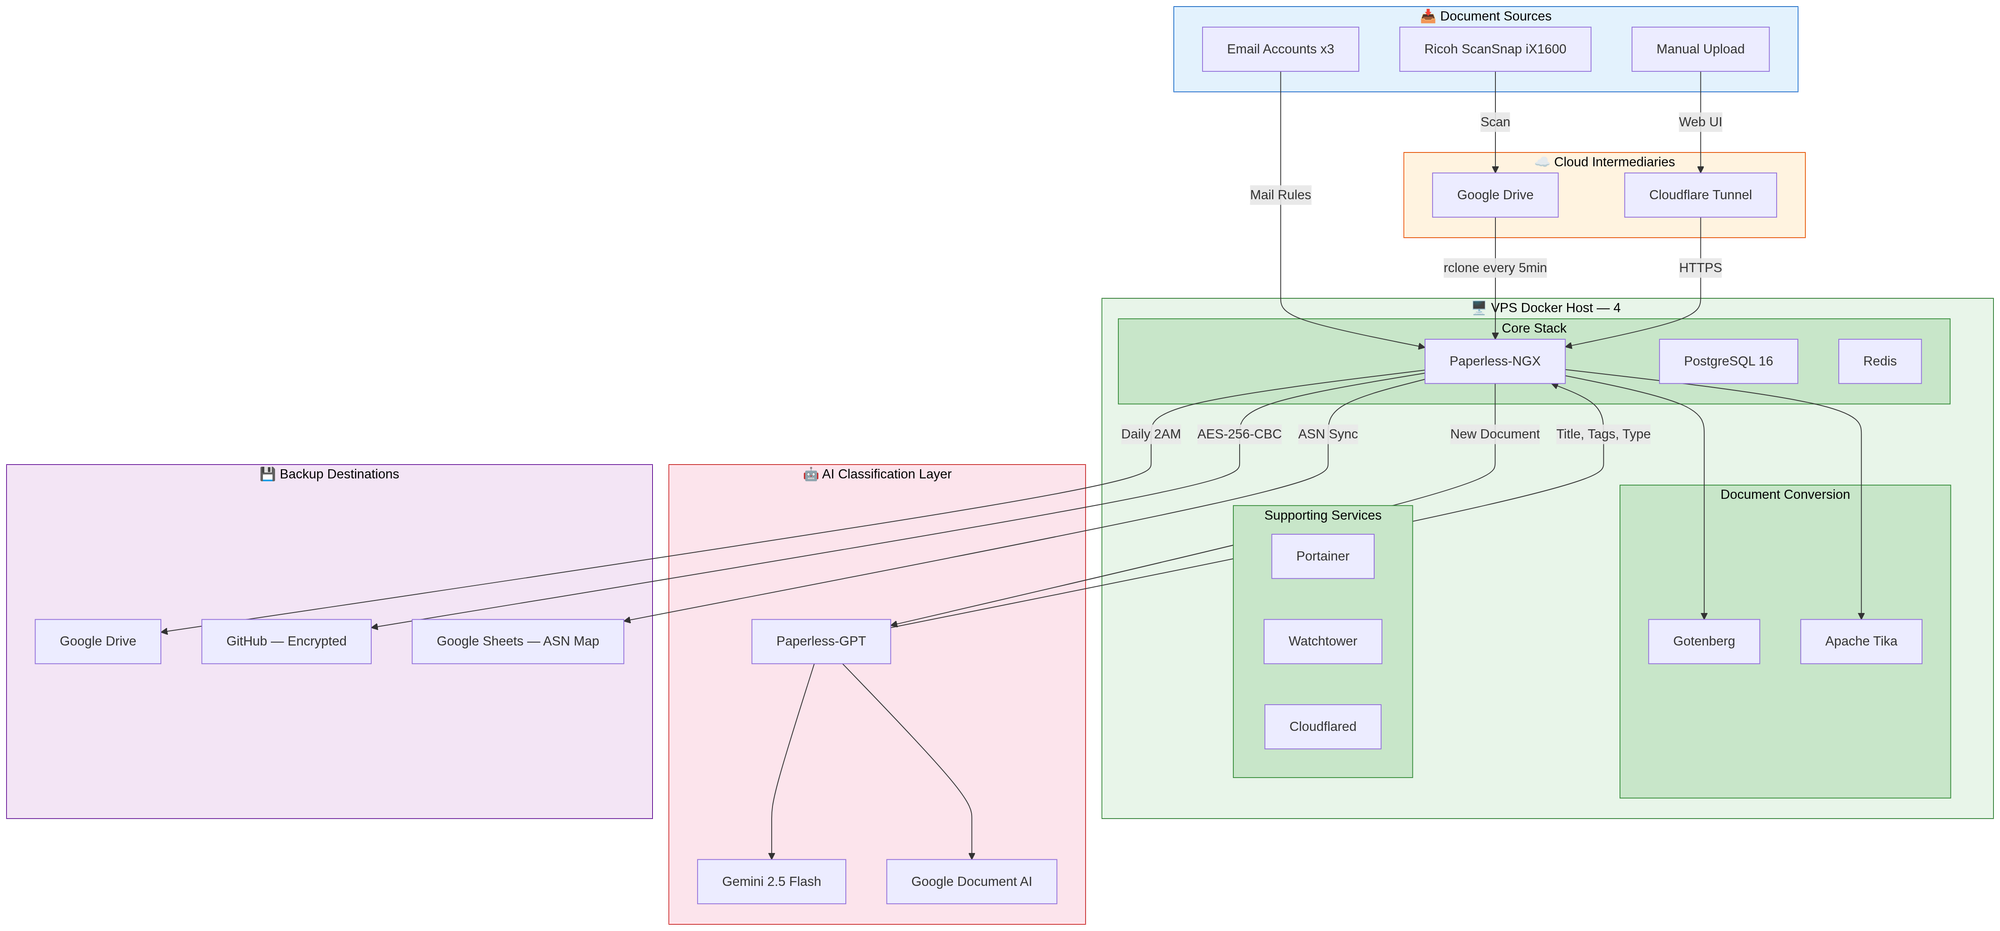
| Container | Role | Memory Limit |
|---|---|---|
| Paperless-NGX | Core document management | 2 GB |
| Paperless-GPT | AI classification (Gemini 2.5 Flash + Document AI) | 256 MB |
| PostgreSQL 16 | Database | 512 MB |
| Redis | Caching and task queue | 256 MB |
| Gotenberg | Document conversion | 512 MB |
| Apache Tika | Text extraction from Office formats | 512 MB |
| Cloudflare Tunnel | Secure HTTPS access (zero open ports) | 128 MB |
| Portainer | Container management UI | 256 MB |
| Watchtower | Automatic container updates | 256 MB |
Total memory footprint: under 5 GB, leaving headroom on the 8 GB VPS.
Document Processing Flow
Step-by-Step Build Guide
Step 1: Server Setup
Start with a fresh Ubuntu VPS. This script installs Docker, configures the firewall, sets up fail2ban, installs rclone for Google Drive sync, and creates the directory structure:
#!/bin/bash
set -e

# Update system
sudo apt update && sudo apt upgrade -y

# Install Docker
curl -fsSL https://get.docker.com | sudo sh
sudo usermod -aG docker $USER

# Firewall - only SSH (all web traffic goes through Cloudflare Tunnel)
sudo ufw allow OpenSSH
sudo ufw --force enable

# Brute-force protection
sudo apt install -y fail2ban
sudo systemctl enable fail2ban && sudo systemctl start fail2ban

# Directory structure
mkdir -p ~/paperless/{data,media,export,consume,redis,db,prompts,backups,scripts}
mkdir -p ~/paperless/consume/{Arbeit,Dokumente,Fahrzeuge,Finanzen,Gesundheit,Wohnen,Sonstiges}

# Install rclone for Google Drive sync
curl https://rclone.org/install.sh | sudo bash

# Backup cron (daily at 2 AM)
(crontab -l 2>/dev/null; echo '0 2 * * * ~/paperless/backup.sh >> ~/paperless/backup.log 2>&1') | crontab -
Step 2: Docker Compose Configuration
This is the complete docker-compose.yml. Replace the placeholder values (YOUR_*) with your own credentials:
services:
  broker:
    image: redis:7-alpine
    container_name: paperless-redis
    read_only: true
    healthcheck:
      test: ["CMD-SHELL", "redis-cli ping || exit 1"]
      interval: 30s
      timeout: 10s
      retries: 3
    security_opt:
      - no-new-privileges:true
    environment:
      REDIS_ARGS: "--save 60 10"
    restart: unless-stopped
    volumes:
      - ~/paperless/redis:/data
    networks:
      - paperless-net
    deploy:
      resources:
        limits:
          memory: 256M

  gotenberg:
    image: gotenberg/gotenberg:8.7
    container_name: paperless-gotenberg
    restart: unless-stopped
    security_opt:
      - no-new-privileges:true
    command:
      - "gotenberg"
      - "--chromium-disable-javascript=true"
      - "--chromium-allow-list=.*"
    networks:
      - paperless-net
    deploy:
      resources:
        limits:
          memory: 512M

  db:
    image: postgres:16-alpine
    container_name: paperless-db
    restart: unless-stopped
    healthcheck:
      test: ["CMD", "pg_isready", "-q", "-d", "paperless", "-U", "paperless"]
      timeout: 45s
      interval: 10s
      retries: 10
    security_opt:
      - no-new-privileges:true
    volumes:
      - ~/paperless/db:/var/lib/postgresql/data
    environment:
      POSTGRES_DB: paperless
      POSTGRES_USER: paperless
      POSTGRES_PASSWORD: YOUR_DB_PASSWORD
    networks:
      - paperless-net
    deploy:
      resources:
        limits:
          memory: 512M

  paperless:
    image: ghcr.io/paperless-ngx/paperless-ngx:latest
    container_name: paperless-ngx
    healthcheck:
      test: ["CMD", "curl", "-fs", "-S", "--max-time", "2", "http://localhost:8000"]
      interval: 30s
      timeout: 10s
      retries: 5
    security_opt:
      - no-new-privileges:true
    restart: unless-stopped
    depends_on:
      db:
        condition: service_healthy
      broker:
        condition: service_healthy
      gotenberg:
        condition: service_started
    ports:
      - "127.0.0.1:8001:8000"
    volumes:
      - ~/paperless/data:/usr/src/paperless/data
      - ~/paperless/media:/usr/src/paperless/media
      - ~/paperless/export:/usr/src/paperless/export
      - ~/paperless/consume:/usr/src/paperless/consume
      - ~/paperless/scripts:/usr/src/paperless/scripts
    environment:
      PAPERLESS_REDIS: redis://broker:6379
      PAPERLESS_DBHOST: db
      PAPERLESS_TIKA_ENABLED: 1
      PAPERLESS_TIKA_GOTENBERG_ENDPOINT: http://gotenberg:3000
      PAPERLESS_TIKA_ENDPOINT: http://tika:9998
      PAPERLESS_TIME_ZONE: Europe/Berlin
      PAPERLESS_SECRET_KEY: YOUR_RANDOM_SECRET_KEY
      PAPERLESS_ADMIN_USER: admin
      PAPERLESS_ADMIN_PASSWORD: YOUR_ADMIN_PASSWORD
      PAPERLESS_URL: "https://your-domain.com"
      # OCR Settings
      PAPERLESS_OCR_LANGUAGE: "deu+eng"
      PAPERLESS_OCR_LANGUAGES: "tur aze"
      PAPERLESS_OCR_MODE: "skip"
      PAPERLESS_OCR_DPI: 300
      PAPERLESS_OCR_SKIP_ARCHIVE_FILE: with_text
      PAPERLESS_OCR_CLEAN: clean
      PAPERLESS_OCR_CACHING: true
      PAPERLESS_OCR_USER_ARGS: '{"invalidate_digital_signatures": true}'
      # Consumer Settings
      PAPERLESS_CONSUMER_POLLING: 10
      PAPERLESS_CONSUMER_RECURSIVE: "true"
      PAPERLESS_CONSUMER_SUBDIRS_AS_TAGS: "false"
      PAPERLESS_CONSUMER_RETRY_COUNT: 3
      PAPERLESS_CONSUMER_DELETE_DUPLICATES: true
      # File Naming
      PAPERLESS_FILENAME_FORMAT: "{{{ correspondent|slugify }}}/{{{ created_year }}}/{{{ created }} {{{ title|slugify }}}"
      PAPERLESS_FILENAME_FORMAT_REMOVE_NONE: "true"
      PAPERLESS_FILENAME_DATE_ORDER: "YMD"
      # Workers
      PAPERLESS_TASK_WORKERS: 2
      PAPERLESS_THREADS_PER_WORKER: 2
      # ASN Barcode Detection
      PAPERLESS_CONSUMER_ENABLE_BARCODES: "true"
      PAPERLESS_CONSUMER_ENABLE_ASN_BARCODE: "true"
      PAPERLESS_CONSUMER_ASN_BARCODE_PREFIX: "ASN"
      PAPERLESS_CONSUMER_BARCODE_SCANNER: "ZXING"
      # Email (for notifications)
      PAPERLESS_EMAIL_HOST: "YOUR_SMTP_HOST"
      PAPERLESS_EMAIL_PORT: 465
      PAPERLESS_EMAIL_HOST_USER: "YOUR_EMAIL"
      PAPERLESS_EMAIL_HOST_PASSWORD: "YOUR_EMAIL_APP_PASSWORD"
      PAPERLESS_EMAIL_USE_SSL: "true"
      PAPERLESS_EMAIL_FROM: "YOUR_EMAIL"
      PAPERLESS_EMAIL_TASK_CRON: "*/5 * * * *"
      # Proxy settings (for Cloudflare Tunnel)
      PAPERLESS_USE_X_FORWARD_HOST: "true"
      PAPERLESS_USE_X_FORWARD_PORT: "true"
      PAPERLESS_PROXY_SSL_HEADER: '["HTTP_X_FORWARDED_PROTO", "https"]'
      PAPERLESS_ALLOWED_HOSTS: "localhost,paperless,your-domain.com"
      PAPERLESS_CORS_ALLOWED_HOSTS: "https://your-domain.com"
      PAPERLESS_CSRF_TRUSTED_ORIGINS: "https://your-domain.com"
      PAPERLESS_DEBUG: false
    networks:
      - paperless-net
    deploy:
      resources:
        limits:
          memory: 2G

  tika:
    image: apache/tika:latest
    container_name: paperless-tika
    restart: unless-stopped
    security_opt:
      - no-new-privileges:true
    networks:
      - paperless-net
    deploy:
      resources:
        limits:
          memory: 512M

  paperless-gpt:
    image: icereed/paperless-gpt:latest
    container_name: paperless-gpt
    environment:
      PAPERLESS_BASE_URL: "http://paperless:8000"
      PAPERLESS_API_TOKEN: "YOUR_PAPERLESS_API_TOKEN"
      PAPERLESS_PUBLIC_URL: "https://your-domain.com"
      MANUAL_TAG: "paperless-gpt"
      AUTO_TAG: "paperless-gpt-auto"
      LLM_PROVIDER: "googleai"
      GOOGLEAI_API_KEY: "YOUR_GOOGLE_AI_API_KEY"
      LLM_MODEL: "gemini-2.5-flash"
      TOKEN_LIMIT: 0
      OCR_PROCESS_MODE: "whole_pdf"
      OCR_PROVIDER: "google_docai"
      GOOGLE_PROJECT_ID: "YOUR_GCP_PROJECT"
      GOOGLE_LOCATION: "eu"
      GOOGLE_PROCESSOR_ID: "YOUR_PROCESSOR_ID"
      GOOGLE_APPLICATION_CREDENTIALS: "/app/credentials.json"
      AUTO_OCR_TAG: "paperless-gpt-ocr-auto"
      OCR_LIMIT_PAGES: "5"
      LOG_LEVEL: "info"
    volumes:
      - ~/paperless/prompts:/app/prompts
      - ~/paperless/google-ai.json:/app/credentials.json
    ports:
      - "127.0.0.1:8080:8080"
    depends_on:
      - paperless
    networks:
      - paperless-net
    deploy:
      resources:
        limits:
          memory: 256M

  cloudflared:
    image: cloudflare/cloudflared:latest
    container_name: paperless-cloudflared
    command: tunnel --no-autoupdate run --token YOUR_TUNNEL_TOKEN
    restart: unless-stopped
    security_opt:
      - no-new-privileges:true
    networks:
      - paperless-net
    deploy:
      resources:
        limits:
          memory: 128M

networks:
  paperless-net:
    driver: bridge
Step 3: AI Classification with Paperless-GPT
Paperless-GPT is the brain of the system. It uses Google Gemini 2.5 Flash for classification and Google Document AI for OCR. Every new document gets:
- A clean, descriptive title extracted from the content
- The correspondent identified (stripped of legal suffixes like GmbH or AG)
- A document type from your predefined categories
- Tags selected from your curated list
- The creation date parsed from the document, not the scan date
- Custom field extraction (expiration dates, amounts, etc.)
A note on privacy: Since Google Document AI and Gemini process document content in the cloud, I only send non-sensitive documents through the automated pipeline. Sensitive documents — things like passport copies, tax returns with personal IDs, or medical records with detailed diagnoses — are classified and titled manually in the Paperless UI. The OCR for those still runs locally via Tesseract (Paperless-NGX's built-in OCR engine), so the content never leaves the server. This is a conscious trade-off: the AI pipeline saves hours of work on the 90% of documents that aren't sensitive, while the 10% that are get handled with extra care.
The prompts are fully customizable Go templates stored in /prompts/. Here's the correspondent prompt as an example — it tells the AI to avoid legal suffixes and provides the existing correspondent list as context:
I will provide you with the content of a document.
Your task is to suggest a correspondent that is most relevant to the document.

Try to avoid any legal or financial suffixes like "GmbH" or "AG" in the
correspondent name. For example use "Microsoft" instead of
"Microsoft Ireland Operations Limited".

If you can't find a suitable correspondent, respond with "Unknown".

Example Correspondents:
{{.AvailableCorrespondents | join ", "}}

The content is likely in {{.Language}}.

Document Content:
{{.Content}}
Step 4: Consume Subfolders and Workflows
The ScanSnap saves files to Google Drive subfolders based on document category. Paperless has 7 consume subfolders, each mapped to a document type via workflows:
| Subfolder | Document Type | Workflow Filter |
|---|---|---|
| Arbeit/ | Arbeit und Beruf | **/Arbeit/** |
| Dokumente/ | Wichtige Dokumente | **/Dokumente/** |
| Fahrzeuge/ | Fahrzeuge | **/Fahrzeuge/** |
| Finanzen/ | Finanzen und Steuern | **/Finanzen/** |
| Gesundheit/ | Gesundheit und Versicherungen | **/Gesundheit/** |
| Wohnen/ | Wohnen | **/Wohnen/** |
| Sonstiges/ | AI decides | — |
Each workflow triggers on Consumption Started (type 1) and uses filter_path to match the subfolder. This ensures the document type is set before the AI runs — so even if the AI disagrees (e.g., a health document in the Finance folder), the subfolder-based type sticks. The exception is Sonstiges (Miscellaneous) — documents scanned into this folder have no workflow, so Paperless-GPT classifies them freely based on content.
Additional workflows automatically assign storage paths based on person tags, organizing files on disk as Person/Correspondent/Year/Date Title.
Step 5: Google Drive Sync
The ScanSnap uploads to Google Drive. A cron job syncs new files to the server every 5 minutes:
# /etc/cron.d/paperless-gdrive-consume
*/5 * * * * ubuntu rclone move "Gdrive:Paperless/Consume/" /home/ubuntu/paperless/consume/ \
  --log-file=/tmp/paperless-gdrive-consume.log --log-level=INFO 2>/dev/null
The rclone move command moves (not copies) files, so Google Drive acts as a temporary drop zone. Configure rclone with rclone config and set up Google Drive OAuth.
Step 6: Physical Document Tracking (ASN Barcodes)
Every physical document gets an Archive Serial Number (ASN) barcode label. I use Avery Zweckform L4731REV-25 removable labels (189 per sheet) and their online designer to print ASN barcodes. Paperless automatically reads the barcode using ZXING when the document is scanned.
A cron script runs every minute to:
- Find all documents with an ASN that aren't tagged "Physical Filed" yet
- Add the "Physical Filed" tag and remove the "Digital Only" tag
- Sync all ASN-to-document mappings to a Google Sheet as a safety backup
#!/bin/bash
# /home/ubuntu/paperless/scripts/asn-physical-filed.sh
TOKEN="YOUR_PAPERLESS_API_TOKEN"
API="http://localhost:8001/api"

# Find docs with ASN but without "Physical Filed" tag
DOCS=$(curl -s "${API}/documents/?archive_serial_number__isnull=false&tags__id__none=PHYSICAL_FILED_TAG_ID&page_size=100" \
  -H "Authorization: Token ${TOKEN}")

IDS=$(echo "$DOCS" | python3 -c "
import json,sys
data = json.load(sys.stdin)
for d in data.get('results', []):
    print(d['id'])
" 2>/dev/null)

for doc_id in $IDS; do
  TAGS=$(curl -s "${API}/documents/${doc_id}/" -H "Authorization: Token ${TOKEN}" | python3 -c "
import json,sys
d = json.load(sys.stdin)
tags = d['tags']
if PHYSICAL_FILED_ID not in tags:
    tags.append(PHYSICAL_FILED_ID)
if DIGITAL_ONLY_ID in tags:
    tags.remove(DIGITAL_ONLY_ID)
print(json.dumps(tags))
" 2>/dev/null)
  curl -s -X PATCH "${API}/documents/${doc_id}/" \
    -H "Authorization: Token ${TOKEN}" \
    -H "Content-Type: application/json" \
    -d "{\"tags\": ${TAGS}}" > /dev/null 2>&1
done
The Google Sheets sync script uses gspread and a Google service account to write all ASN mappings to a spreadsheet. This means even if I lose the entire Paperless server, I still have a record of which ASN corresponds to which document.
Step 7: Backup Strategy (3-2-1 Rule)
Backups run automatically at 2:00 AM daily with three destinations and rotation:
| Destination | Method | Retention |
|---|---|---|
| Google Drive | rclone upload | 7 daily / 4 weekly / 3 monthly |
| GitHub (private repo) | AES-256-CBC encrypted | 7 daily / 4 weekly / 3 monthly |
| Local | On-disk copy | Same rotation |
The backup script exports all documents from Paperless, uploads to Google Drive, encrypts and pushes to GitHub, rotates old backups, and verifies integrity. Healthchecks.io notifies me if anything fails.
#!/bin/bash
# backup.sh - Daily Paperless backup with rotation and monitoring
set -e

DATE=$(date +%Y-%m-%d)
DAY_OF_WEEK=$(date +%u)
DAY_OF_MONTH=$(date +%d)

PAPERLESS_DIR="/home/ubuntu/paperless"
BACKUP_DIR="$PAPERLESS_DIR/backups"
CONFIG_REPO="/home/ubuntu/paperless-config"
GDRIVE_DIR="Backups/Paperless"

# Load .env (contains HEALTHCHECK_URL and ENCRYPTION_PASSPHRASE)
source "$PAPERLESS_DIR/.env"

# Healthchecks.io integration
healthcheck_start() { curl -fsS -m 10 --retry 5 "${HEALTHCHECK_URL}/start" >/dev/null 2>&1 || true; }
healthcheck_success() { curl -fsS -m 10 --retry 5 "$HEALTHCHECK_URL" >/dev/null 2>&1 || true; }
healthcheck_fail() { curl -fsS -m 10 --retry 5 "${HEALTHCHECK_URL}/fail" >/dev/null 2>&1 || true; }

healthcheck_start

# Export from Paperless (-sm = split manifest for faster imports)
cd "$PAPERLESS_DIR"
docker compose exec -T paperless document_exporter ../export --zip -sm

EXPORT_FILE=$(ls -t "$PAPERLESS_DIR/export/export-"*.zip 2>/dev/null | head -1)
[ -z "$EXPORT_FILE" ] && { healthcheck_fail; exit 1; }

# Determine backup type
if [ "$DAY_OF_MONTH" == "01" ]; then
    BACKUP_TYPE="monthly"
elif [ "$DAY_OF_WEEK" == "7" ]; then
    BACKUP_TYPE="weekly"
else
    BACKUP_TYPE="daily"
fi
BACKUP_NAME="paperless-${BACKUP_TYPE}-${DATE}.zip"

# Copy locally and upload to Google Drive
cp "$EXPORT_FILE" "$BACKUP_DIR/$BACKUP_NAME"
rclone copy "$BACKUP_DIR/$BACKUP_NAME" "Gdrive:$GDRIVE_DIR/$BACKUP_TYPE/"

# Rotate local and remote backups
find "$BACKUP_DIR" -name "paperless-daily-*.zip" -mtime +7 -delete
find "$BACKUP_DIR" -name "paperless-weekly-*.zip" -mtime +28 -delete
find "$BACKUP_DIR" -name "paperless-monthly-*.zip" -mtime +90 -delete
rclone delete "Gdrive:$GDRIVE_DIR/daily/" --min-age 7d 2>/dev/null || true
rclone delete "Gdrive:$GDRIVE_DIR/weekly/" --min-age 28d 2>/dev/null || true
rclone delete "Gdrive:$GDRIVE_DIR/monthly/" --min-age 90d 2>/dev/null || true

# Verify integrity
unzip -t "$BACKUP_DIR/$BACKUP_NAME" >/dev/null 2>&1 || { healthcheck_fail; exit 1; }

# Encrypted backup to GitHub
if [ -n "$ENCRYPTION_PASSPHRASE" ] && [ -d "$CONFIG_REPO" ]; then
    mkdir -p "$CONFIG_REPO/encrypted-backups/$BACKUP_TYPE"
    openssl enc -aes-256-cbc -salt -pbkdf2 \
        -in "$BACKUP_DIR/$BACKUP_NAME" \
        -out "$CONFIG_REPO/encrypted-backups/$BACKUP_TYPE/paperless-${BACKUP_TYPE}-${DATE}.zip.enc" \
        -pass pass:"$ENCRYPTION_PASSPHRASE"

    # Rotate encrypted backups
    find "$CONFIG_REPO/encrypted-backups/daily" -name "*.enc" -mtime +7 -delete 2>/dev/null || true
    find "$CONFIG_REPO/encrypted-backups/weekly" -name "*.enc" -mtime +28 -delete 2>/dev/null || true
    find "$CONFIG_REPO/encrypted-backups/monthly" -name "*.enc" -mtime +90 -delete 2>/dev/null || true

    cd "$CONFIG_REPO" && git add -A
    git diff --staged --quiet || git commit -m "Backup $DATE - $BACKUP_TYPE (encrypted)" && git push origin main
fi

healthcheck_success
Step 8: Security Hardening
There are two approaches to making Paperless accessible remotely. I use both — pick whichever fits your threat model.
Option A: Tailscale VPN (Private Access Only)
Tailscale is a zero-config WireGuard mesh VPN. Install it on your server and your devices, and Paperless becomes accessible only to machines on your private network — invisible to the rest of the internet.
# Install Tailscale
curl -fsSL https://tailscale.com/install.sh | sh
sudo tailscale up --ssh

# Expose Paperless via Tailscale HTTPS (only accessible from your tailnet)
tailscale serve --bg --https=443 http://localhost:8001

# Lock SSH to Tailscale only
sudo ufw allow in on tailscale0 to any port 22
sudo ufw delete allow 22
The result: Paperless is available at https://<your-machine>.tail*.ts.net with a valid TLS certificate, accessible from any device on your tailnet — laptop, phone, tablet. Zero open ports, no certificate management, no dynamic DNS.
Pros: Maximum security. The server has no public-facing ports at all. Even SSH is VPN-only.
Cons: Every device needs Tailscale installed. Not suitable if you need public access.
Option B: Cloudflare Tunnel (Internet-Facing)
If you need to access Paperless from any browser without installing a VPN client, Cloudflare Tunnel gives you a public URL with DDoS protection and no exposed ports.
# Install cloudflared
curl -fsSL https://pkg.cloudflare.com/cloudflare-main.gpg | sudo tee /usr/share/keyrings/cloudflare-archive-keyring.gpg
echo "deb [signed-by=/usr/share/keyrings/cloudflare-archive-keyring.gpg] https://pkg.cloudflare.com/cloudflared $(lsb_release -cs) main" | sudo tee /etc/apt/sources.list.d/cloudflared.list
sudo apt update && sudo apt install cloudflared

# Authenticate and create tunnel
cloudflared tunnel login
cloudflared tunnel create paperless
cloudflared tunnel route dns paperless docs.yourdomain.com

# Run the tunnel (point it at Paperless)
cloudflared tunnel --url http://localhost:8000 run paperless
Pros: Accessible from any browser, no client software needed, free DDoS protection.
Cons: Your application is exposed to the internet. Add Cloudflare Access or another auth layer (Authelia, Authentik) in front for additional protection.
My recommendation: Use Tailscale for daily access and lock everything behind the VPN. If you need occasional public access for specific use cases, add a Cloudflare Tunnel with a Zero Trust Access policy on top.
Baseline hardening for either option:
- All containers run with
no-new-privileges: true - Memory limits on every container to prevent runaway processes
- Randomized 66-character
SECRET_KEY - Redis in read-only mode
- All ports bound to
127.0.0.1(localhost only) - fail2ban for SSH brute-force protection
The Numbers
After running for several weeks:
| Metric | Count |
|---|---|
| Documents managed | 900 |
| Correspondents (auto-detected) | 254 |
| Document types | 7 |
| Tags | 90+ |
| Mail rules | 24 (across 3 email accounts) |
| Active workflows | 21 |
| Saved views | 13 |
| Storage paths (per person) | 4 |
| Docker containers | 10 |
| Total disk usage | ~1.3 GB |
What I Learned
Subfolder-based classification beats tag-based approaches. I tried three different methods: using consume subdirectories as tags, tracking tags with enforce workflows, and simple path-based workflows. The simplest approach (subfolder → document type workflow) won. Scanning into a named folder is faster and more reliable than relying on AI alone.
AI needs guardrails for document types. Gemini is excellent at generating titles and identifying correspondents, but it sometimes reclassifies documents based on content rather than intent. A health insurance bill about a work injury might get classified as "Health" when you filed it under "Work." The subfolder workflow running before AI solves this.
Physical-digital bridging matters. The ASN barcode system with Google Sheets backup means I never lose track of where a physical document is stored. Even if my server dies, I can look up any document by its ASN number.
Backup redundancy is worth the complexity. Three backup destinations (Google Drive + encrypted GitHub + local) with automatic rotation means I can rebuild the entire system from scratch on a new server in under an hour.
Start with fewer tags. I ended up with 90+ tags which is borderline too many. The AI tag suggestions work better with a focused, curated list. If I started over, I'd aim for 30-40 carefully chosen tags.
The entire system runs hands-off. Documents arrive by email or scanner, get classified by AI, filed by person, and backed up to three locations. The only manual step is sticking an ASN barcode label on physical documents before scanning — about 30 seconds per document.
